Tuesday, July 28, 2015

VIOLIN SHAPED CARD TUTORIAL

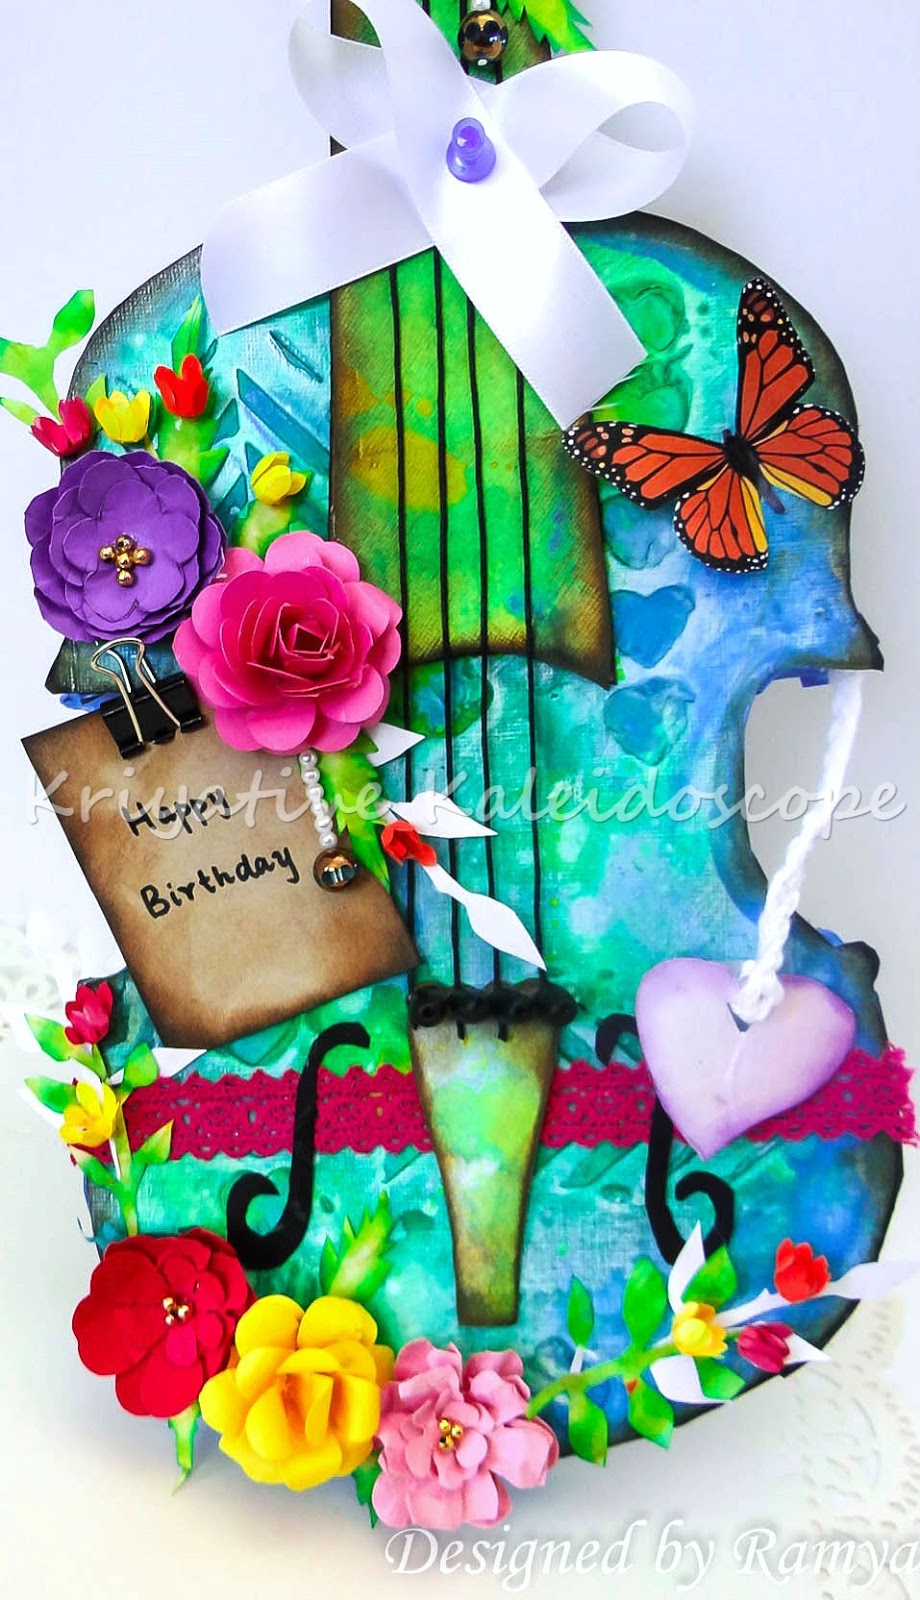
Hello Friends, welcome to my blog!! As promised in my previous post am here with the details on making the violin shaped card.

I made the entire card using canvas paper. They are not only sturdy but  they also have a nice texture on them.


Mixed media work.:
Here are the steps I followed in creating a mixed media effect on the card:
1. I started off by applying a thick coat of gesso all over the violin.
2. Then using a modeling paste and stencil I created random textures.
3. Once its dried I used my homemade sprays ( acrylic paint+water+rubbing alcohol). 
4. Then I distressed the edges .
5. I applied blue glossy acrylic paint all over the sides of the violin.  


I was actually making a jewelry the previous day I made this card. So all my jewelry findings lay near me when I was embellishing this card. So you can see  many of my jewelry supplies being used in this project. The thread used for strings is a waxed cotton thread which I generally use for terracotta jewellery. And for the fine tuner knobs I used my oval shaped terracotta beads. 

The flowers are all handmade using recollections punches and decorated using small golden beads ( again from my jewelry stash...)The leaves are all handcut and distressed using yellow and green inks. 

I altered a shopping tag by distressing it with brown and green inks. Added a binder clip and wrote the sentiment using marker. For the upper bout section of the violon( top right ) I added a butterfly and a small heart shaped tag . I wanted to add some danglers , so once again used the  jewellery beads to make one. 
Finally added a bow using white ribbon. 

Tutorial:

1. Draw a shape of violin in a card stock and cut 2 pieces one for the top and the other for the base of the violin.
2. Measure the length of the curve using a thread. For convenience I have divided the violin into 3 sections. 


3. Measure the length of the first curve using thread and scale method. Let it be x.
4. Cut a strip of paper measuring 4 cm by x cm( the length of the curve). 
5. Mark 1 cm up and down on the cut strip and draw a line. 

6. Make a fold on the marked lines.
7. Cut small slits on the folded portion. 

8. Glue the slits to the base of the violin. The slits make it easy to follow the shape of the base. 
9. Similarly measure the length of the curve 2 & 3.and repeat the same process ( steps 3 to 8).

10. Glue the top portion of the violin to the upper slits.
11. Draw and cut the shape of the finger board. You can use card boards to make it sturdy. 
12. Now stick the fingerboard and the tailpiece to the body  of the violin. 


Hope this post is helpful to you !! Do leave your comments/suggestions.

Entering this project to the following competitions:

1.Lulupu challenge blog - " Anything but square and rectangle - " I have created a violin shaped card
2.Beyond grey challenges " Dimensional project"
3.Scrap around the world challenge
I was inspired by the colors and flowers.
4.We love to create challenge - " Anything mixed media"


Friday, July 24, 2015

A SURPRISE ROMANTIC PROPOSAL

Hello , Welcome back to my blog!! Today I have a romantic project to share with you all.
Well the month of july is the month of my husband's birthday.I wanted to make something special for this special person of my life as he loves my handmade gifts. Usually I will plan in advance but since we went to Florida for a vacation I was left with three days to make a gift. That was when I saw a cliche proposal scene on a commercial. The guy plays a guitar and sings a song praising that girl. Then he kneels down and proposes to her with a rose. Suddenly a thought struck me - How nice it would be if I propose to my husband in a similar way on his birthday. My brains got into work and finally I tried to create a proposal scene with my crafting skills. 


I don't have a guitar nor I don't know to play it. So made a mixed media violin shaped card using card stock

I don't grow roses at my home. So made a red foam sheet rose.


Instead of singing a song I wrote a poem for him and framed it using tree branches.


I arranged all the elements of proposal upon a  box ( altered laptop box)and covered it using a wood grain paper. For the backdrop I recycled packaging card boards and wood grain paper. Finally decorated using lace and t lights. 


Hope you liked my creation !! Come back soon for my upcoming post on the details of making violin shaped card.   I would love to hear your comments and suggestions!!

Entering this project to the following  :

city crafter challenge blog -  " Hemp cord or twine will be fine"  - I have used ribbon and twine in my project.
Lessology challenge  - " Wood grain" - I have used wood grain paper and wooden branches for frame.
Anything but cute - " Summer romance"
Anything but a card Challenge

Tuesday, July 14, 2015

NO LINE COLORING CARD

Hello friends, Welcome back to my blog!! Today am sharing with you all my DT post for Create something catchy challenge. This month's theme is No line coloring. You can check out the details of the challenge here. I created a simple round shaped card using watercolor.
 I took a white cardstock and cut it into a circular shape. Sponged the background using watercolors. Then I drew the flowers using 2h pencil and coloured using 00 brush.  The sentiment is a print out. I decorated the card using silver twine and rhinestones.


Hope you all like my card. Don't forget to link your creations at CSCC. 

Monday, June 29, 2015

SUNSET AT THE BEACH - CLAY MURAL WORK

Hi friends, Welcome back to my blog!! As the post title says today's post is about sunset at the beach. As its pretty hot here we go to beaches almost every weekend. California is well known for its cliff lined beaches and beautiful lighthouses surrounded by a bed of rocks. Here during summer the sunset occurs between 8-8.30 pm. 


Two weeks back we had been to this amazing beach called "Grey whale cove" near half moon bay. We drove to the top of the hill and from there we overlooked the beach. Then we took a wooden staircase to go down to the waters. The beach was calm with a big lighthouse on top of a mountain and the different shades of blue in the water was clearly visible.An hour before the sunset the sky prepares itself by changing its colour. We can see pink, violet and yellow colour of the sky  This is the hour I love most so  tried to imbibe all of these in my creation.


The one thing that I miss in the US beaches are the beautiful coconut trees which I will find along the shores of Kerala beaches. So to fulfill my wish added two coconut trees. I wanted my painting to have a 3D effect so used air dry clay for the lighthouse and the trees. 


I recycled am old plastic plate for this project. I started off by applying a thick coat of gesso to the plate. Once its dried I sketched the outline of the painting. Then I took the sir dry clay and pasted them wherever I want. This is my first full fledged oil painting.  So I wasn't able to capture the full effect of sunset in this painting. Once the paint is dried I gave a coat of varnish. 


Submitting this to

Lulupu Challenge - " Summer splash" - I have created a beach themed mural painting.
City crafter challenge blog - " Lets get " nautical"
Allsorts challenge blog - " Blue as ocean"
Frilly and funkie challenge blog - " Summer"
Simon monday challenge blog - " Summer"
Altered eclectics- I have altered a plastic plate into a mural


Monday, June 22, 2015

GRAND PIANO BOX CARD TUTORIAL

Hello Friends, Welcome back to my blog!! Today's post is very special and nostalgic to me. It's been a long time since I played keyboard. As my in laws are here they insisted me to play and show them. When I started to play old memories queued my mind one by one. So that's the birth story  of this post.


 I remembered the first time when I played keyboard. It was a gift from my dad for my 10th birthday. He himself an admirer of music had very good collection of music albums with him. That helped me to learn new ragas and songs apart from what the teacher taught me. My dad was instrumental in shaping up my hobbies and motivated me to try something new always. Still he reads each and every post of mine and gives suggestions and ideas.


The second great person associated with this piano is my grandfather. He was my first audience and critic. He would be with me throughout my piano class and will make sure that I learn and practice the song properly. He would listen patiently to all my stories and will make me laugh by telling jokes. If he was there today I would tell him lot of stories.


As I reached my  12th standard my studies took precedence over my hobbies and over the years somehow lost interest towards the piano. It was my cousin brother who rekindled my  passion and inspired me to play by sending his recordings.We both used to play piano together during our vacation. He taught me to combine music and technology . With his help I did my first ever  recording with beats using a software. Whenever I have a problem he will always be there for me. So I would like to thank these 3 great men of my life and dedicate this post to them.


Here is the pictorial:

Materials needed:

1. Black cardstock  12*12 " ( 2 nos)
2. Vintage music notations pattern paper
3. Piano keys print out
4. Hot glue gun
5. Scissor, ruler
6. Flower embellishments

The basic template:


Take an A4 sheet and draw the design shown above. Cut this design and place it on a 12*12 card stock.


The cardstock should be double the size of the paper template which we had cut above. Mine is 6.5". So I  took a 12*12 cardstock. Trace the design onto the card stock. Flip the template to the other side and trace it.  Then cut this design. This will form the upper part of the piano .


Cut another card stock as that of the design template for the bottom portion.  To cover the sides of the piano measure the length of the side.  For me it was 6.3" or 16 cm. To measure the length of the curve, take a thread and mark the starting point with an ink. Run this thread through the curve. At the end point make another dot with the marker ( the marked points indicated using arrows in the picture). 
 Now  Stretch the thread and measure the length. This gives the length of the curve.  For covering the sides cut a strip of black card stock with the length we measured and with the breadth of 3cm. From the top and bottom measure 1 cm and make a crease. Paste one creased line on the top portion and the other line on the bottom portion of the piano.


 For covering the curved portion of the piano cut a strip of cardstock with the length we measured and with the breadth 3 cm. From the top and bottom mark 1 cm and make a crease. Cut slits as shown in the picture and glue it to the top and bottom portions of the piano. The slits make it easy to fit into the curve. 

Measure the lower edge down the piano. Cut a cardstock with the length measured and breadth 2 cm. For the inside stick and 3 legs I used 4.5cm by 9cm piece of cardstock. I rolled and glued them to the piano using hot glue gun.

Stick the vintage paper inside and paste the keys as shown. Decorate the upper portion using flowers and other embellishments. The flowers used here are all handmade by me. 


For the piano chair I stacked 4 pieces of cardboard together. The design on the chair is hand drawn. The legs of the chair measures 2 cm by 8 cm. I placed a quilled doll on top of the chair . Hope you all liked this post. Please leave your valuable comments/ feedback. 


Friday, June 19, 2015

SEA SHELL JEWELLERY

Hello Friends, Welcome back!! Summer has spread its hot wings here in California , so to chill out we went to the beach last week. I have the habit of collecting sea shells so that I can use it in my craft projects. This time to my surprise I found some cute tear drop shaped shells. I love tear drop earrings so searched for the shells that are similar. Though I couldn't find the exact match there were few shells that are quite similar. So more than playing in the water I spent time collecting sea shells and was dreaming about the jewellery that I will make with them ( lol). Here is the jewellery which I made ... 


I took extreme care that they should not break during our travel. After reaching home I washed it with mild soap water and wiped using a towel. The next step was to paint. I chose silver pearl paint as I don't have much of silver coloured earrings.


After 2 coats of pearl paint to get the gloss gave a coat of varnish. I don't want to drill holes on the shells as am afraid it will break. So this is how ( below pic) I attached the eye pins to the shells. I used air dry clay and tacky glue. 


I loved the earrings very much so made a  matching chain with that!!


Now I have a sea shell jewellery set!!

Submitting this to
Earrings everyday - " June reveal"


This is the inspiration picture... I was inspired by the sea shells...

Monday, June 15, 2015

ICE CREAM CAS CARD

Hello friends, Welcome back to my blog!! Today am here to share my inspiration post for Create something catchy challenge...


 The theme for this month's challenge is to create CAS ( Clean And Simple) card based on this stylish ( below) inspiration picture....  Click here for more details...


When I saw the picture the first thing that caught my attention was the ice cream.... That's because am eating too many ice creams these days.. So I made a simple card inspired by the ice cream and colours of the picture...

Here is the pictorial on how I made this card:

 I coloured the image using distress inks.


The sentiment is a print out. Hope you all liked my card. Thanks for visiting and don,t forget to participate in our challenge. Click here to enter....

Submitting this card to the following competitions:

Crafty catz challenge blog - Clean and simple cards

Cas-ual fridays - CFC #140 -Michele's idea of summer - I have used the skin tan colour , blue colour and lots of white space.

The crafters cafe challenge blog - " Anything goes"

Papercreators crafts -" Anything goes"