Monday, November 20, 2017

WARLI ART CLAY MURAL

Hello Friends , Welcome to my blog!! Today am sharing with you all Warli art on a canvas board using air dry clay. I actually made this for my friend/ neighbor who bought a new house . 
This friend who herself is an excellent artist loves everything creative and handmade. Since she is from Gujarat decided to make a Warli art welcome sign for her new home. 


I used polyform air dry clay and artist's loft canvas board for making this mural. Here are some pics of the process. 

I referred the internet and finalized a design and did a rough sketch on the canvas board. Then cut out a triangular shaped template for the structure of the warli man. I made sure that all the warli men are of the same size. 


Once the clay work is over I let it dry for two days and then started to paint. I used Daler Rowney's black acrylic and folkart metallic gold colors. Finished the mural by applying two coats of varnish.


Thanks for stopping by. See you soon with another interesting post. 

Friday, October 6, 2017

ALTERED CARDBOARD BOX

Hello Friends, Welcome back!! Today am sharing an altered art project with you all.


Last week one of my friend invited me to her house for Navarathri. Since she likes art and craft I wanted to gift her something handmade. That's when this cell phone stand cardboard box caught my attention. As it was sturdy decided to give it a makeover and made this treasure/ jewellery box from it.


The first step was to alter the box so that it could have a horizontal opening. The beautiful fall themed pattern paper is from recollections brand. Decorated the box using golden lace and border punch. All the flowers are handmade using card stock and recollection punches. 


For the inside of the box I used black cardstock. The sentiment is handwritten on an oval chipboard using black sharpie. 


For easy and tight opening and closing mechanism I adhered a golden button and a loop. 

See you soon with another interesting post. Thanks for stopping by. I would love to hear to suggestions and comments. 

Monday, September 25, 2017

DIGITAL PORTRAIT PAINTING

Hello friends, welcome back!! Today am sharing with you all my first attempt in creating a digital portrait of my daughter. I made this painting for her first birthday which we celebrated a month back.


I wanted to create something special for her first birthday and that's when I came across the digital portrait painting class by Gabrielle Brickey in skillshare. Taking up that course gave me confidence to try painting my daughter's face. I used "Krita "software for the whole process.

See you soon with another post... Do leave your comments/ suggestions. 

Wednesday, August 23, 2017

T SHIRT DESIGN

Hello friends, Welcome to my blog!! Today I am sharing something different from my usual posts. My first attempt in designing a T shirt with the  art supplies theme for entering into the arty-outfit competition hosted by draw with Jazza.

I designed two T shirts incorporating the art supplies theme. As I was browsing for some T shirt design ideas I came upon this word art He"art". I decided to use this concept and drew a rough design on a paper. Then I scanned the image and using vector art created an svg file using inkscape. Inkscape is an open source software which is very useful for vector drawing.


The second T shirt is inspired by a tattoo design found in pinterest. I am always a big fan of zentangle art. So modified the tattoo design a little and created a zentangle themed T shirt. For this initially I drew it on a paper using sharpie and then scanned the image and tweaked the edges using inkscape pen tool.


Hope you all like my designs. Thanks for stopping by my blog . See you soon.


Tuesday, August 8, 2017

ALTERED CAKE BASE BOARD

Hello friends Welcome back to my blog!! Am posting after a long time as I was busy with my one year old baby. Since this is the birthday season in our house we bought cakes to celebrate them. After consuming the cake the base board of the cake was very sturdy that it resembled a circular canvas. So altered it to a mixed media layout. 


I cleaned the base board using a wet cloth and then applied thick coats of gesso. For textures I scrunched the butter paper pieces ( tissue paper ) and pasted using glue Then applied some random textures using texture paste and stencils. I used diluted alcohol ink  and color shine sprays of teal , yellow and green color. Distressed the edges using brown ink and glued scraps of paper from DCWV paper pack. Stamped the sentiment , clock and tape. Decorated the layout using handmade flowers , pearls, beads and lace. 


Since my baby has started to move she is pulling everything from my craft table.Since most of the mixed media supplies are toxic and harmful I don't craft much these days. But will try my best to post as often as possible. 


 See you soon with another interesting post. Do share your comments/suggestions. 

Tuesday, June 20, 2017

JUTE / BURLAP JHUMKA AND EARRING TUTORIAL

Hello Friends, Welcome back!! Today's post is about jute jewellery making. Jute jewellery is becoming very famous now not only because of its light weight and unique aesthetics but also because its environmentally friendly.  It is fashionable and goes well with casual attire.This is my first attempt in working with jute.i thoroughly enjoyed the process as making and decorating these earrings are easy and less time consuming compared to other types of handmade jewellery.  I have a short pictorial for making the earrings. At the end of this post I have mentioned some links from where you can buy jute sheets online in India as well in US.


MATERIALS NEEDED:

1. Jute sheets of different color
2. Scissors
3. cardstock
4. Fabric glue
5.Glue gun
6. jewellery making rope or thread( waxed cotton thread)
6. Beads and stone chain for decoration
7. ruler , compass and pencil

JUTE JHUMKAS:

I referred the tutorial by Radhika of hobbycrafts blog for making this. I modified the process a little to make the jhumkas more sturdy.


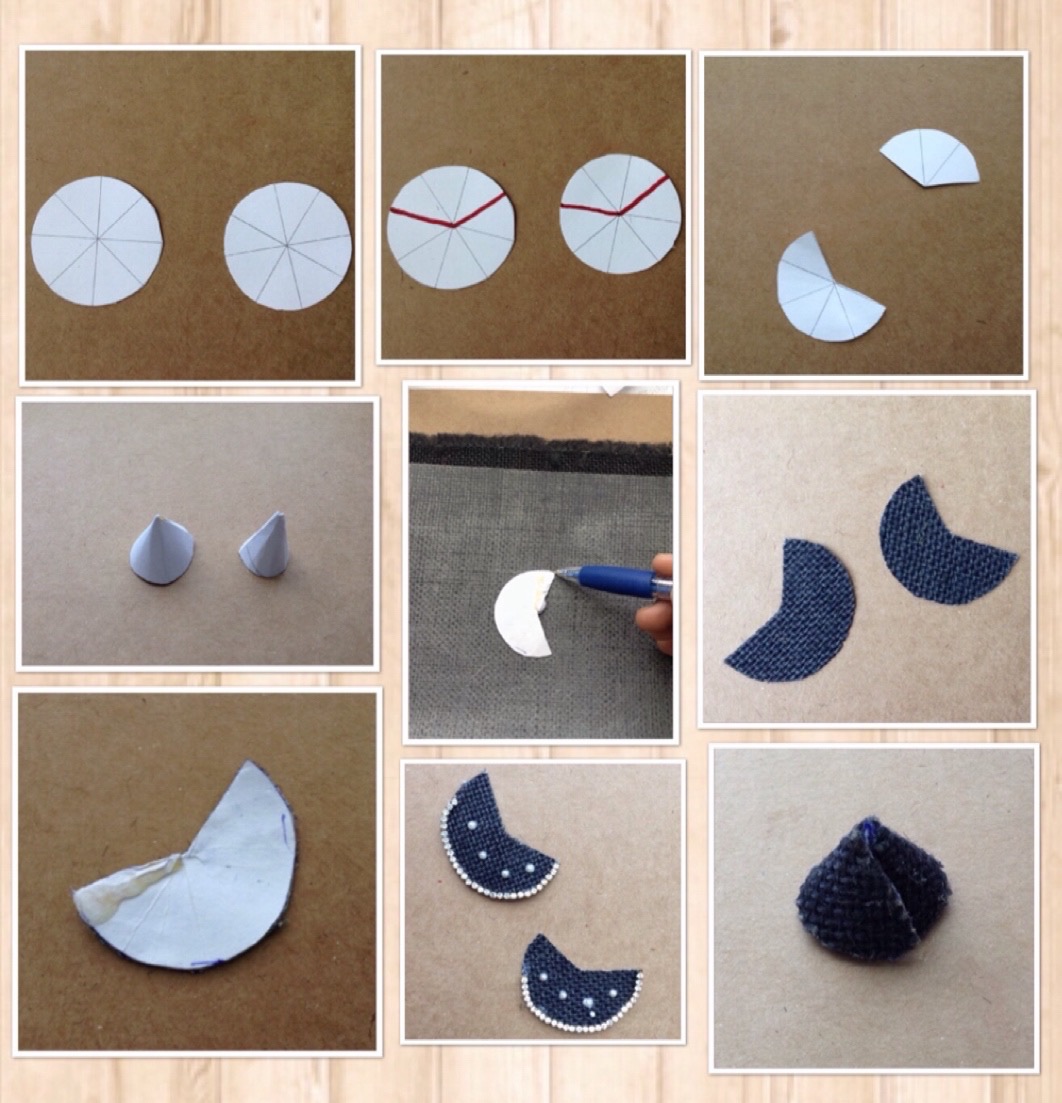
  • Cut two circular pieces from card stock . The radius of the circle is the height of the jhumka . 
  •  Draw lines crossing the center of the circle. 
  • Cut the pieces into sectors as shown in pic3. 
  •  The bigger sector makes a larger cone and smaller sector makes a narrow cone. Here I have chosen a broader cone as it will be easy to embellish. 
  • Finalize the shape and size of the jhumkas before proceeding to cut on the jute sheet as jute sheets are expensive. 
  • Paste the cut card stock onto the back of the jute sheet to make it more sturdy.
  • Mark the point where the fold will come and embellish the rest of the jute fabric. 
  • Join both the ends of the sector to make the shape of a cone (jhumka) using a glue gun.
  • Slightly trim the top of the cone to make a hole to insert eyepin. 

JUTE EARRINGS:


  • To make one earring we need two pieces of jute fabric cut in the desired shape . 
  • Paste the jute sheet onto a thick paper. Here I have used a watercolor paper.
  • Cut the pasted portion of the paper and paste the other jute sheet on its back. So it will be two jute sheets sandwiched in between by a thick paper. 
  • Since the edges of the jute sheets are fuzzy we have to glue the jewellery thread to get a neat finish.
  • Decorate the earring with sequins or bling or wooden beads.
  • Punch a small hole at the top and attach jump ring.
I made two more earring by following the above procedure.


Hope you all liked this post. See you soon with another interesting post. 

Links to buy jute sheets:
In India: http://itsybitsy.in/search/?q=jute+sheets
US: http://burlapfabric.com/colored-burlap/colored-burlap-sheets?zenid=k4207t0ihec05ri1u6mf6bjjo0
Radhika's blog for jute earrings tutorial: http://radhika-hobbycrafts.blogspot.com/2015/09/jute-jhumkas.html


Thursday, May 11, 2017

ALTERED TIN MIXED MEDIA WORK

Hello Friends, Welcome to my blog!! Today am sharing an altered art project with you all. I have altered an empty salt tin into a mixed media pen stand. 


This project is inspired from Ola Khomenok's tutorial on altered bottle.  I first gave two thick coats of gesso to the tin and started working on the textures. The ideas to make different textures was inspired from Maremi small art. Initially I created textures using stencil and texture paste. Then mixed seed beads , urad dal and fenugreek seeds with texture paste and applied randomly. Stuck some lace and thread and glued the handmade flowers( made using recollections 5 petal punch) The feather is hand cut from watercolor paper. Finally covered the embellishments and textures using diluted gesso. 


Once everything is dried I  started working on mists and sprays. I used home made shimmer spray of crimson color as the base coat. Then dabbed  some  metallic red and copper color  paint here and there finally dry brushed using old gold metallic paint. Added some dots using liquid pearls. 


Now this salt tin is ready to decorate my craft table as I will be using it to store my brushes and tools. Hope you all liked this post. See you soon with another post. Have a great weekend!!

Entering this project to the following challenges:

1.Creative Artiste mixed media - " Anything mixed media"
2. Country view challenges - " Flower power"
3.Let's craft and create challenge - " make your own background" - I made the background using textures and paint sprays.
4.More mixed media challenge - "Anything mixed media with optional twist to use color pink"
5.A bit more time to craft - "  Anything goes"
6. Rhedd's creative spirit - " Altered art/ mixed media"
7.Altered eclectics - " Altered art"
8.We love to create challenge blog - " Anything creative/mixed media"
9.Rainbow craftykari challenge - "blooms magic" - All the flowers are handmade using recollections five petal punch.

Monday, April 10, 2017

PEN AND INK SKETCHES INSPIRED FROM PINTEREST

Hello friends, welcome to my blog!! Today am sharing with you all my fountain pen sketches inspired from pinterest and other sites.


This sketch is inspired from aval vikatan magazine done by artist by Shyam.

This is a randomly inspired image from google.


This illustration of Big Ben London is from deposit photos.


The below image is inspired from  artist Sara Herranz .


This mage is inspired from balletforadults.com.


Inspired from the artist Cassandra. Found this in tumblr.
All sketches are done using fountain pen and pitt marker pen. See you soon with another interesting post. Have a nice week ahead.

Tuesday, April 4, 2017

CROCHET HEADBAND

Hello friends, Hope you all are doing good.. Today am sharing a crochet headband made for my baby. This is my first attempt in learning to crochet.


I followed the tutorial of  Lisa Needlecrafts and made this project using single crochet stitch. Its very easy and suitable for a beginner like me.


For making the flower I followed the tutorial of Simplydaisy and used 5 double crochet stitch for big petals and 5 single crochet stitch for small one.


I loved making this headband and thoroughly enjoyed the process of crochet. For learning the basics of crochet follow this tutorial -Crochet Guru
See you soon with another interesting post.

Thursday, March 2, 2017

ALTERED PLASTIC SPOONS INTO FRIDGE MAGNETS

Hello Friends, Hope you all are doing great . Welcome back !! Today am sharing with you all an altered project using spoons.

Two weeks back while I was browsing through pinterest I came across this altered wooden spoons. I liked them very much and wanted to try.  When we got parcel food from a restaurant last week there were some extra plastic spoons.  Also the rotis were packed using a foil and all the boxes were  inside a brown paper bag.  So not only I enjoyed the food but also recycled the plastic spoons, foil paper and brown paper bag and created this project.


I made it in two different themes - mixed media and secret garden.

The making process:
Mixed media theme:
For the mixed media one  I covered the plastic spoon with the left over aluminium foil ( in which rotis were wrapped) to get a grungy texture. Then randomly applied texture paste and gave the spoon a uniform coat of gesso. Now the spoon is ready to take the paints and sprays. I applied violet, dark blue and magenta pearl acrylics and blue acrylic spray. Once I was satisfied with the result I applied antique gold using the dry brush process. I embellished it using punched flowers.


Secret garden spoon:
This idea is inspired from our recycle queen Rupa's altered strainer into a nest. I covered the spoon with a pattern paper and distressed the edges with brown color. The nest is made by shredding the brown paper bag. The flowers are punched using recollection daisy punch and distressed using inks. The leaves are hand cut , the sentiment is hand written and the butterfly is a print out.


After finishing these spoons I wanted to showcase it in an apt place. My 6 month old baby daughter loves seeing the fridge magnets when I take her to kitchen . So glued two magnets each in both the spoons and added it to our fridge magnet collection for her to enjoy.


See you soon with another creative post. Have a nice weekend.

Submitting this to the following challenges:

1 .Rhedd's creative spirit - " Altered art/ mixed media
2. Altered Eclectics - " Altered art"
3. We love to create challenge blog - " Anything creative / mixed media

Sunday, February 19, 2017

ROSE BOUQUET - 3D CLAY ART

Hello Friends welcome back!! Its the month of february so its all about roses and hearts. Today am sharing with you all a rose bouquet wall mural done on a canvas board.


This is my first attempt in making a clay mural. I actually started this project last year but for some reason could't compete. Last week while I was hanging my other craft projects I came across this unfinished canvas and decided to finish it.


I have used polyform brand air dry clay. They are easy to mold as well dries very hard and doesn't break.I have used fevicryl acrylic colours for painting the mural. 


Hope you all liked it. See you soon with another interesting post.

Monday, January 23, 2017

DOT PAINTING/ABORIGINAL ART

Hello friends, Welcome back!! Today am sharing with you all dot painting/ aboriginal art on canvas inspired from pinterest. 


This art work consisting of dots ,  cross hatching , maps of circles , spirals is the long established language of Western desert aboriginal people. The dot technique gives the painting an almost 3D effect and a sense of movement . To know more about the history of this art click here


I got inspired by Rachelsaunders work and followed her style. I used 16cm*10cm canvas and folkart acrylic paints. The interesting thing about this work is that it can be done using simple household objects and doesn't call for artist brushes. For the big dots I used the backside of my parker pen , for the medium and small dots I used backside of my brush and toothpick respectively.


This is indeed a very relaxing and therapeutic art. It helped me to overcome my stress of motherhood and sleepless nights. Thanks for stopping by. See you with another interesting post. Have a great week ahead!!

Entering this project to the following challenges:

1.A bit more time to craft - " Anything goes"
2.Love to create challenge - " Anything creative/mixed media"
3.Creative fingers challenge blog - " Anything goes"


Tuesday, January 17, 2017

MIXED MEDIA MONOGRAM USING CARDBOARD


Hello friends, Welcome back !! Am happy to be back to crafting after 8 long months!!  Today am sharing with you all a mixed media monogram made using packaging cardboard. 


This post is dedicated to the new arrival of our family - my daughter Vinaya. She is 5 months old now and have started observing colors and flowers. We have planned to have a small welcome baby party for our friends. So to decorate the house I made this flowered letter/monogram/ photo frame with my daughter's name keeping in mind the bright colors she like.

Here is the pictorial of the monogram:


Draw and cut the letter V in a canvas paper. Using that as the template draw and cut the alphabet from the packaging cardboard. Paste the canvas sheet over the cardboard and prime it with thick coats of gesso. I used Artist's loft white gesso. Once its dried create textures using stencils and texture paste. I used Americana stencils and liquitex texture paste. 
Add colors using acrylic sprays or paints. I used teal color shine spray,  pink homemade shimmer spray , violet and gold pearl paint. I repeated the process till I was satisfied with the result. For attaching the frame and alphabets glue a piece of cardboard and canvas sheets on the sides as shown above.Finally embellish the monogram with flowers, glitters, pearls and sequins. All the flowers are handmade and the alphabets are written with pitt marker pen.


You can make these monogram in the name of your friends and gift them . 


I would like to thank all my followers and friends for supporting my page and blog.I will try my best to keep you posted with more craft tutorials and projects. 

See you soon with another interesting post.

Entering this project to the following challenges:

1. Alphabet challenge blog - " V for violet"
2.Country view challenges - " Anything goes"
3.love to create challenge - " Anything mixed media/creative"
4.More mixed media challenge - " Anything goes mixed media"
5.A bit more time to craft - " Anything goes"
6. Dream valley challenges - " Something new" - I created this project for my newborn baby
7.Allsorts challenge blog -  " Things with wings"