Friday, July 31, 2015

BEACH DAYS - MIXED MEDIA LAYOUT

Hello Friends, Welcome back to my blog. Hope you all are doing good. Still I haven't recovered from my vacation fever. For this year summer vacation we had been to Florida as my sis in law lives there. So it was a fun filled family time plus little sightseeing.  We spent most of our time chatting, watching movies , playing with kids etc. It was indeed a great relaxation for us. 
Florida is the home for amazing warm water beaches. So we visited  beach almost everyday. Each one was different and special in its own way. One day we visited the beach at the morning to take bath . The warm waters, cool breeze and gentle waves made it a memorable experience. We all played at the beach, made fun of each other and took lots of pics.
All the shells found in this LO are collected from a place called Barefoot beach at Naples  When I  expressed my wish of crafting using these shells, everyone joined me in collecting some similar and beautiful shells. All these shells carry their love and care for me. Am happy to get such a family by marriage. I wanted to preserve these shells and make something nice that reminds me of  this wonderful trip. So created a beach themed mixed media layout. 
I started off by giving a thick coat of gesso to the canvas . Then used home made sprays of blue and green color. I kept on adding layers till I was satisfied with the result. Then with a stencil applied gesso randomly. Used 3D out liner to to make hexagon shaped net. Made a frame using packaging cardboard and plastic sheet ( recycled from packaging cover) The image is a print out. I made the starfish and the small white balls ( inside the frame) using air dry clay. Embellished using handmade flowers. Finally decorated using glitter foam sheet , pearls and rhinestones.

Like these glittering leaves and branches I pray to god that our lives and relationship should shine forever. Looking forward to our next family reunion.

Entering this LO to the following competitions:

1.4 crafty chicks - Challenge #257- "Anything goes"
2.Country view challenges - " On your travel" - I created this Layout inspired by my vacation to Florida
3.The craft place challenge blog - " Words"
4.Shopping our stash weekly challenge blog - " Diamonds are a girl's best friend"
5.Mixed media monthly challenge blog -"Summer days"
6.We love to create challenge - " Anything mixed media/creative/inky
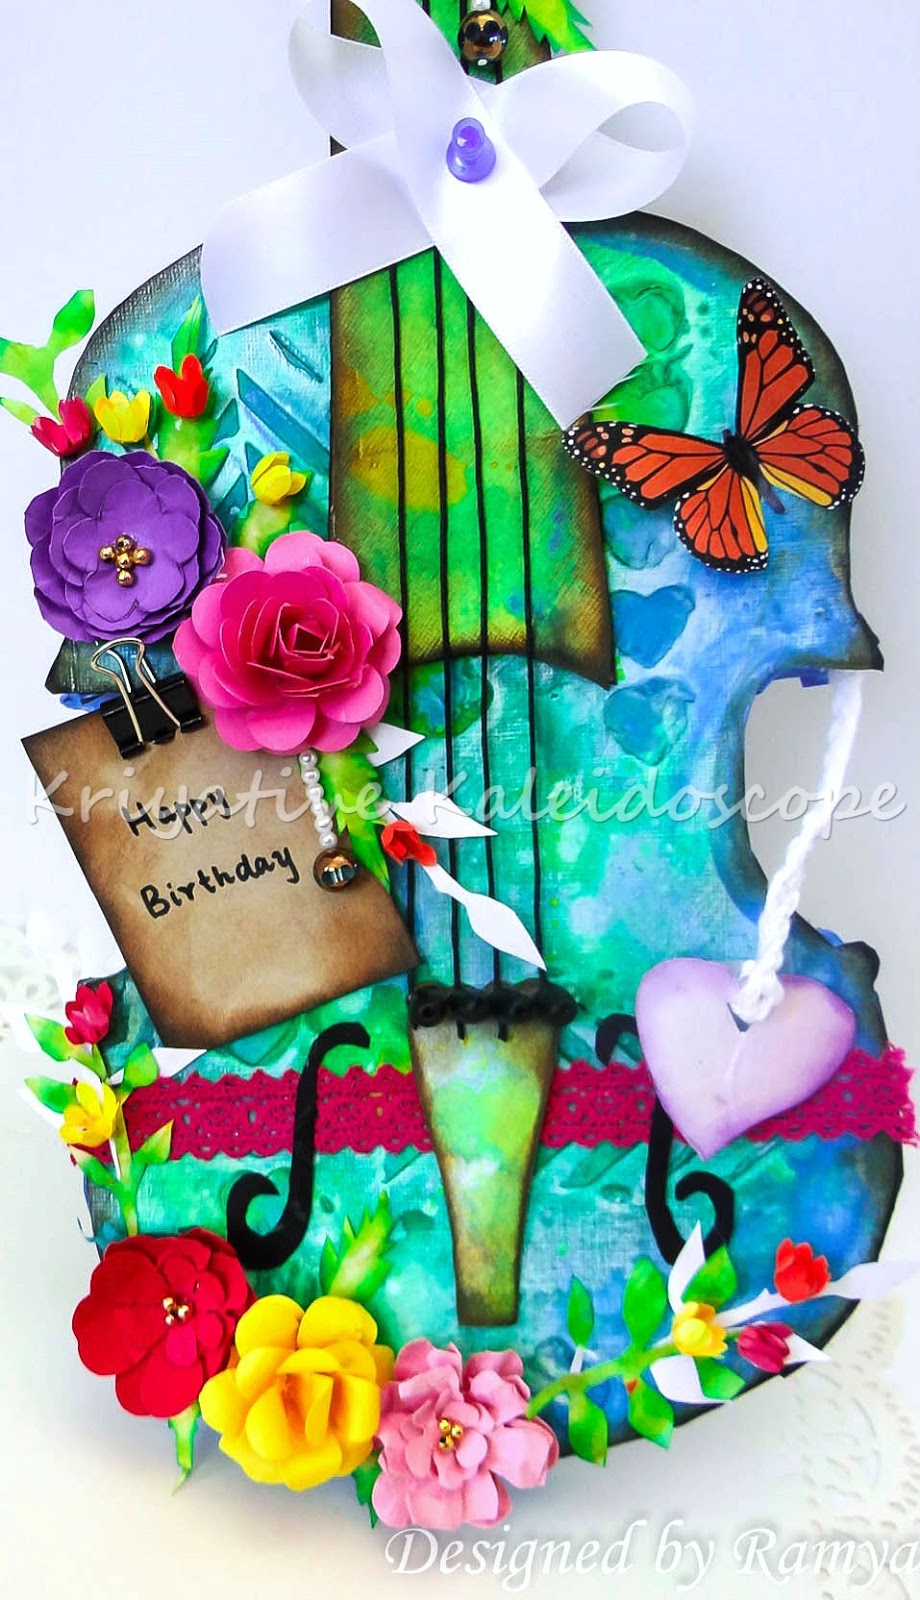
7.The mirror crack'd - " canvas" -- I have used distress inks, color shine sprays and stencils on my canvas.


Tuesday, July 28, 2015

VIOLIN SHAPED CARD TUTORIAL

Hello Friends, welcome to my blog!! As promised in my previous post am here with the details on making the violin shaped card.

I made the entire card using canvas paper. They are not only sturdy but  they also have a nice texture on them.


Mixed media work.:
Here are the steps I followed in creating a mixed media effect on the card:
1. I started off by applying a thick coat of gesso all over the violin.
2. Then using a modeling paste and stencil I created random textures.
3. Once its dried I used my homemade sprays ( acrylic paint+water+rubbing alcohol). 
4. Then I distressed the edges .
5. I applied blue glossy acrylic paint all over the sides of the violin.  


I was actually making a jewelry the previous day I made this card. So all my jewelry findings lay near me when I was embellishing this card. So you can see  many of my jewelry supplies being used in this project. The thread used for strings is a waxed cotton thread which I generally use for terracotta jewellery. And for the fine tuner knobs I used my oval shaped terracotta beads. 

The flowers are all handmade using recollections punches and decorated using small golden beads ( again from my jewelry stash...)The leaves are all handcut and distressed using yellow and green inks. 

I altered a shopping tag by distressing it with brown and green inks. Added a binder clip and wrote the sentiment using marker. For the upper bout section of the violon( top right ) I added a butterfly and a small heart shaped tag . I wanted to add some danglers , so once again used the  jewellery beads to make one. 
Finally added a bow using white ribbon. 

Tutorial:

1. Draw a shape of violin in a card stock and cut 2 pieces one for the top and the other for the base of the violin.
2. Measure the length of the curve using a thread. For convenience I have divided the violin into 3 sections. 


3. Measure the length of the first curve using thread and scale method. Let it be x.
4. Cut a strip of paper measuring 4 cm by x cm( the length of the curve). 
5. Mark 1 cm up and down on the cut strip and draw a line. 

6. Make a fold on the marked lines.
7. Cut small slits on the folded portion. 

8. Glue the slits to the base of the violin. The slits make it easy to follow the shape of the base. 
9. Similarly measure the length of the curve 2 & 3.and repeat the same process ( steps 3 to 8).

10. Glue the top portion of the violin to the upper slits.
11. Draw and cut the shape of the finger board. You can use card boards to make it sturdy. 
12. Now stick the fingerboard and the tailpiece to the body  of the violin. 


Hope this post is helpful to you !! Do leave your comments/suggestions.

Entering this project to the following competitions:

1.Lulupu challenge blog - " Anything but square and rectangle - " I have created a violin shaped card
2.Beyond grey challenges " Dimensional project"
3.Scrap around the world challenge
I was inspired by the colors and flowers.
4.We love to create challenge - " Anything mixed media"


Friday, July 24, 2015

A SURPRISE ROMANTIC PROPOSAL

Hello , Welcome back to my blog!! Today I have a romantic project to share with you all.
Well the month of july is the month of my husband's birthday.I wanted to make something special for this special person of my life as he loves my handmade gifts. Usually I will plan in advance but since we went to Florida for a vacation I was left with three days to make a gift. That was when I saw a cliche proposal scene on a commercial. The guy plays a guitar and sings a song praising that girl. Then he kneels down and proposes to her with a rose. Suddenly a thought struck me - How nice it would be if I propose to my husband in a similar way on his birthday. My brains got into work and finally I tried to create a proposal scene with my crafting skills. 


I don't have a guitar nor I don't know to play it. So made a mixed media violin shaped card using card stock

I don't grow roses at my home. So made a red foam sheet rose.


Instead of singing a song I wrote a poem for him and framed it using tree branches.


I arranged all the elements of proposal upon a  box ( altered laptop box)and covered it using a wood grain paper. For the backdrop I recycled packaging card boards and wood grain paper. Finally decorated using lace and t lights. 


Hope you liked my creation !! Come back soon for my upcoming post on the details of making violin shaped card.   I would love to hear your comments and suggestions!!

Entering this project to the following  :

city crafter challenge blog -  " Hemp cord or twine will be fine"  - I have used ribbon and twine in my project.
Lessology challenge  - " Wood grain" - I have used wood grain paper and wooden branches for frame.
Anything but cute - " Summer romance"
Anything but a card Challenge

Tuesday, July 14, 2015

NO LINE COLORING CARD

Hello friends, Welcome back to my blog!! Today am sharing with you all my DT post for Create something catchy challenge. This month's theme is No line coloring. You can check out the details of the challenge here. I created a simple round shaped card using watercolor.
 I took a white cardstock and cut it into a circular shape. Sponged the background using watercolors. Then I drew the flowers using 2h pencil and coloured using 00 brush.  The sentiment is a print out. I decorated the card using silver twine and rhinestones.


Hope you all like my card. Don't forget to link your creations at CSCC.